A few months ago, I was looking at ways to schedule my Twitter content: basically, I wanted to define when a specific tweet should be posted. The reason behind this? Mostly, I wanted to promote content from my blog for people in different timezones. I live in Singapore, which means that when I use Twitter in the morning, people in Europe are still asleep, and people in the US are likely going to bed soon as well. So I was looking for a way to post the same content multiple times during different times of the day to reach different people. Additionally, I wanted to prepare some content for the monthly CollabTalk, which happens to take place at 1am Singapore time. Not really a time where I plan to be active on Twitter, especially during the week.
While there are nice free and paid tools out there, I wanted to see if I can use Azure Functions for my purpose. With a little help of Azure Table Storage and a 3rd party library, I was able to create the tool fairly quickly, and have been using it for a while now (around 3 months). Here’s how I set it up:
Creating a Twitter application
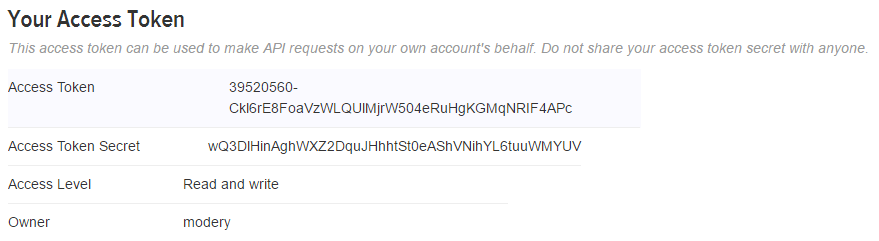
To post to Twitter as a specific account, we need to set up a new application on https://apps.twitter.com/. After you’ve followed all the needed steps, write down the Consumer Key, Consumer Secret, Access Token, and Access Token Secret.

Setting Up your Table Storage
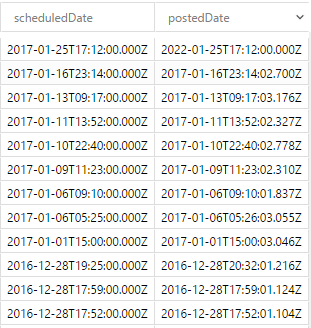
We will use Azure Table Storage to store our tweets and their status. I set up a new table called ‘scheduledcontent’ with the following schema:
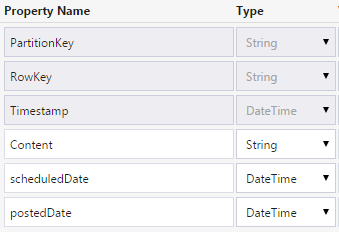
As for the PartitionKey, I’m using “Scheduled” for any content that still needs to be posted, and “Posted” for content that has been processed already. That way, my queries against the table are quite easy to do, as I can use this column to filter.
Content contains the actual content I want to tweet, scheduledDate the date and time on which it should happen. Lastly, postedDate is for logging purposes, this field will be updated to store the actual date and time of the tweet.
Creating your Function App
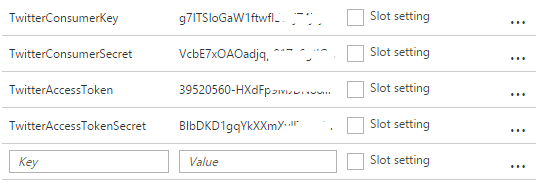
Moving on, create your Function App. What you need to do here is to go to your App Service Settings and add the twitter keys and secrets from the previous step as key/value pairs:

I named my as follows:
Configuring your Function
Now comes to fun part: configuring our Function and adding the relevant plumbing and code. To connect to Twitter and post content, I’m going to use a fork of TweetSharp available at https://github.com/Yortw/tweetmoasharp, and include the corresponding nuget package in my Function.
First of all, we need to include the required Azure Storage and TweetSharp nuget packages. Create a Project.json file and add the following content:
{
  "frameworks": {
    "net46":{
      "dependencies": {
        "WindowsAzure.Storage": "7.0.0",
        "TweetMoaSharp" : "*"
      }
    }
   }
}
Once the packages have been installed, you can configure your Function to trigger on a schedule. I initially had it set to run every 15 minutes, but changed it at some point to run every minute ( 0 */1 * * * *):
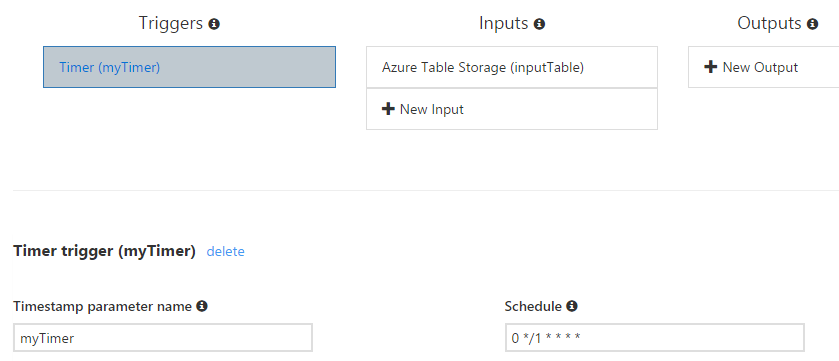
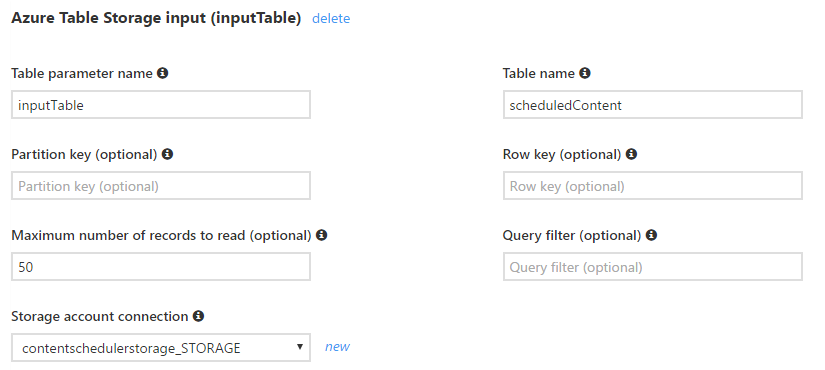
Let’s move on to configuring the Azure Table Storage connection as an input. Give it a name (inputTable here), enter the Table name you defined earlier, and create the correct Storage account connection.
We’ve now finished the configuration, let’s add some code!
using System;
using System.Configuration;
using TweetSharp;
using Microsoft.WindowsAzure.Storage.Table;

public static void Run(TimerInfo myTimer, CloudTable inputTable, TraceWriter log)
{
    log.Info($"C# Timer trigger function executed at: {DateTime.Now}");

    //fetch all Scheduled tweets
    //Filters: PartitionKey = Scheduled and scheduledDate is in the past
    TableQuery<ScheduledContentEntity> rangeQuery = new TableQuery<ScheduledContentEntity>().Where(
        TableQuery.CombineFilters(
            TableQuery.GenerateFilterCondition("PartitionKey", QueryComparisons.Equal, "Scheduled"),
            TableOperators.And,
            TableQuery.GenerateFilterConditionForDate("scheduledDate", QueryComparisons.LessThanOrEqual, DateTime.Now)));
    log.Info($"Fetching all scheduled tweets at: {DateTime.Now}");
    List<ScheduledContentEntity> ScheduledEntities = inputTable.ExecuteQuery(rangeQuery).ToList();

    //if there is a scheduled tweet that needs to get posted, let's do it
    if(ScheduledEntities.Count > 0) {
        log.Info($"{ScheduledEntities.Count} new tweets to post at: {DateTime.Now}");

        //authenticating with Twitter
        var _consumerKey = ConfigurationManager.AppSettings["TwitterConsumerKey"];
        var _consumerSecret = ConfigurationManager.AppSettings["TwitterConsumerSecret"];
        var _accessToken = ConfigurationManager.AppSettings["TwitterAccessToken"];
        var _accessTokenSecret = ConfigurationManager.AppSettings["TwitterAccessTokenSecret"];
        var service = new TwitterService(_consumerKey, _consumerSecret);
        service.AuthenticateWith(_accessToken, _accessTokenSecret);

        //post all the scheduled tweets
        foreach (ScheduledContentEntity entity in ScheduledEntities)
        {
            //tweet
            TwitterStatus result = service.SendTweet(new SendTweetOptions
            {
                Status = entity.Content
            });
            log.Info($"{entity.Content} at: {DateTime.Now}");
            log.Info($"{result.CreatedDate.ToString()} at: {DateTime.Now}");

            //It was not possible to update table rows, so we have to create a new entry and delete the old one.
            //create new entry
            ScheduledContentEntity content = new ScheduledContentEntity(Guid.NewGuid().ToString(), entity.Content, entity.scheduledDate, DateTime.Now);
            TableOperation insertOperation = TableOperation.Insert(content);
            inputTable.Execute(insertOperation);
            //delete old one
            TableOperation deleteOperation = TableOperation.Delete(entity);
            inputTable.Execute(deleteOperation);
        }
    } else {
        log.Info($"Nothing to tweet at: {DateTime.Now}");
    }
}


public class ScheduledContentEntity : TableEntity
{
    public ScheduledContentEntity() {
    }

    public ScheduledContentEntity(string rowkey, string c, DateTime sd, DateTime pd) {
        this.PartitionKey = "Posted";
        this.RowKey = rowkey;
        this.Content = c;
        this.scheduledDate = sd;
        this.postedDate = pd;
    }
    public string Content { get; set; }
    public DateTime scheduledDate {get; set;}
    public DateTime postedDate {get; set;}
}
This code here should be pretty straight-forward to read and understand. Every minute, it checks if there are any entries in our table storage which are set as ‘Scheduled’ (PartitionKey), and if so, tweets them.
Creating an extremely fancy ultra-modern frontend
Well, not really. Sorry, nothing great to show here, the backend was more important to me than the frontend. I created an extremely simple MVC app with a form that creates new entries in my Azure table (RowKey is a random GUID, by the way), and shows scheduled tweets in a standard table on the page. I also use Azure Storage Explorer from time to time, mostly for editing. I’ll leave you up to you to create a fancy site with all the features you want – URL shortening, editing of scheduled tweets, …
The Result
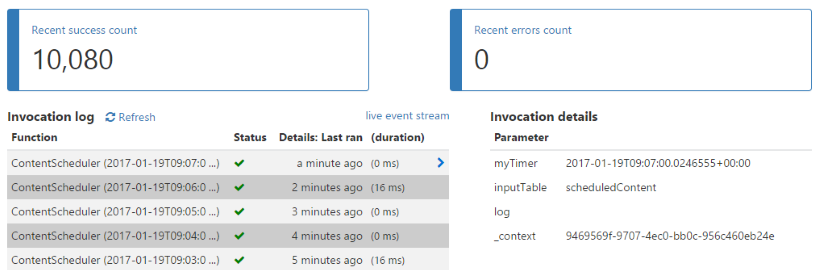
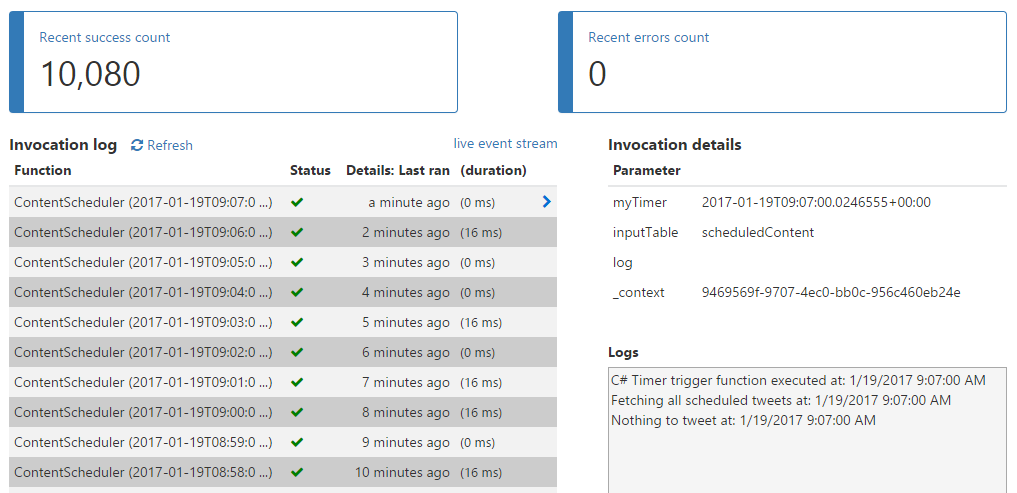
As I mentioned, I’ve been using this set up for some time now, but only scheduled around 50 tweets so far. In case you’re wondering how fast it is, most of the time the tweet gets posted 1-2 seconds after I scheduled it:
Any errors so far? None:
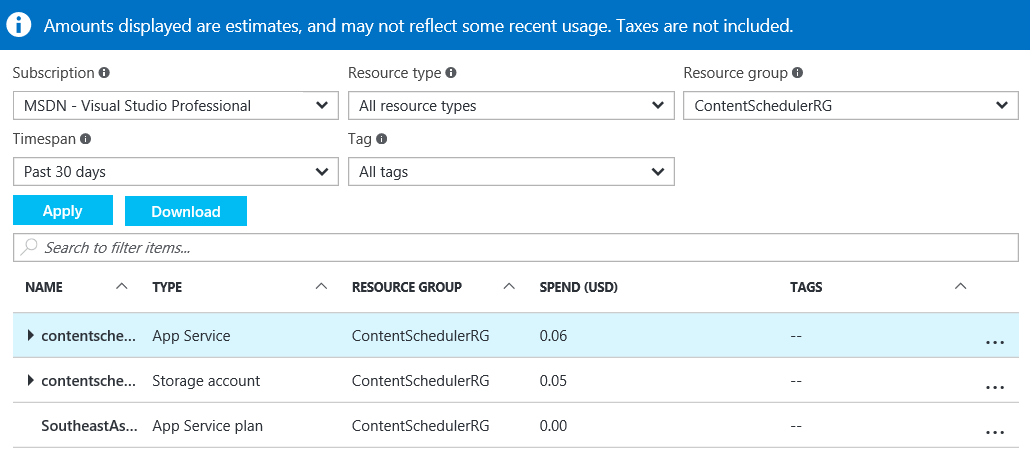
I was also asked to provide some information on the costs. Here are the costs for the past 30 days:
What’s Next?
For my purpose, this is already good enough. While it lacks a lot of things (as mentioned, editing of tweets, shortening of URLs, error handling, maybe a bit more security), it does its job quite well, so I’ll keep it as it is for the moment
Scheduling Twitter Content with Azure Functions https://t.co/CYx7ZhEajh #azurefunctions #azure
RT @modery: Scheduling Twitter Content with Azure Functions https://t.co/CYx7ZhEajh #azurefunctions #azure
Scheduling Twitter Content with Azure Functions https://t.co/PHz3LMH3cS #Office365
Discover how to schedule twitter content with #Azure Functions https://t.co/roSdupRGc2 from @modery https://t.co/eOxRrKrfm4
RT @mattein: Discover how to schedule twitter content with #Azure Functions https://t.co/roSdupRGc2 from @modery https://t.co/eOxRrKrfm4
https://t.co/CwBW36LajS
Scheduling Twitter Content with Azure Functions https://t.co/ErN7dpQeF3 https://t.co/VvdMBfxiPb
RT @mattein: Discover how to schedule twitter content with #Azure Functions https://t.co/roSdupRGc2 from @modery https://t.co/eOxRrKrfm4
This is a great example for using the technology. I’m gonna try to build something like this. Thanks!
Scheduling Twitter Content with Azure Functions – Rene Modery https://t.co/aL7QVGG1xE